An Easy Way to Transfer from iPod to iTunes
I was called upon this weekend by a friend whose computer died. She and her daughter had about 1,000 songs between their two iPods, which were purchased online, as well as copied from their own CDs, into iTunes. Their songs were now trapped on the dead computer and on their two iPods. What to do? Good news for any of you in this dilemma – with little time and effort and at the low cost of $14.99 you can transfer your music from your iPod to iTunes.
If their broken computer was functional, I would have attached an external hard drive (like an extra brain) to the computer. Then I could have moved their music libraries to the external hard drive and onto the new computer. But, that wasn’t an option.
If I plugged their iPods into their new computer and did a sync (making the computer and iPod combine content), iTunes would have wiped out everything on the iPods. Obviously not an option.
Instead, I visited the wesbite http://www.purpleghost.com/ and downloaded (moved from the website to their computer) the program TuneJack. Have your credit card at the ready. Be sure to print the receipt when your purchase is complete. TuneJack will send you an e-mail with a license number that is required to begin the installation of the program onto your computer.
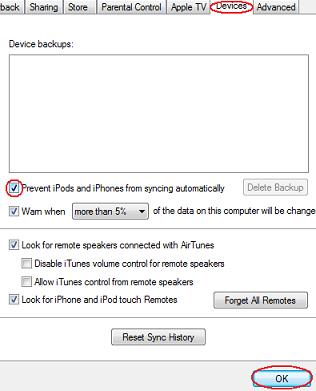
Before you start the download process, open iTunes and make the following change:
1) Click Edit.
2) Click Preferences.
3) Click on Devices tab.
4) Click in the box to the left of “Prevent iPods and iPhones from syncing automatically.”
5) Click OK.
This stops iTunes from automatically syncing when your iPod is plugged in. There can be times when you don’t want to sync automatically. This is one of those times.
Next, plug in your iPod. There’s one more change we want to make before we install TuneJack.
1) Wait until iTunes identifies your iPod, click on your device in the left hand sidebar.
2) Click in box to left of “Automatically sync when iPod or iPhone is connected” to remove the check – deactivating the choice.
3) Click Apply.
4) Click on “eject” symbol ![]() to the right of your device name then unplug your iPod.
to the right of your device name then unplug your iPod.
iTunes will now NOT open automatically when you plug in the iPod. (We don’t want iTunes to be open when we use TuneJack. They don’t play well together.)
Next close any open programs on your computer – especially iTunes.
Great! Now you can install TuneJack by following their very clear instructions. I always like to turn my computer off and back on after I install a new program. That’s your call.
A shortcut for TuneJack will appear on your desktop. Double-click on the icon and follow their step-by-step instructions. (A warning window will appear asking you to deactivate the auto sync at plug-in. We’ve already done that, but you can double check. Be sure to close iTunes after checking.)
At the step where TuneJack wants to find your iPod, plug in your iPod and wait patiently. When I did the initial transfer from the iPod to iTunes an error message appeared. I didn’t panic. I just repeated all the steps again and it worked perfectly the second time around.
Be patient, read what’s in front of you, and take deep breaths. Keep in touch and let me know how it worked.
For those of you that don’t know an iPod from your elbow (and you’re not alone), take a peek at Chapter 24 – Extra, Extra, Read All About It: The Scoop on Cell Phones, PDAs, Blackberries, iPods and iPhones in “Is This Thing On?” A Computer Handbook for Late Bloomers, Technophobes and the Kicking & Screaming (p. 349).


